
How to play with a Freeman
Blocking direct entry into the circle, occupying dangerous areas of space and problem-solving in defence
What is a Freeman?
A Freeman is an extra player to help in defence. The free player is created through the press. This usually involves the front 3 dealing with 4 defenders in not only the press but also in defence. Please see the back 4 and back 3 presses if you do not know what I mean.
Why do we need a Freeman?
- The Freeman is crucial in problem-solving in defence
- The Freeman occupies dangerous areas of space
- The Freeman blocks direct entry into the circle
Imagine this scenario: The whole team is in a man-to-man press, with the opposition on the ball. Through clever play, leading and some individual skill the opposition's Centre Half has managed to beat their man. Our Centre Back leaves his man to step up and tackle the oncoming opposing Centre Half. The Centre Half passes to the wide-open player left by the Centre Back who scores on a helpless goalkeeper. While this is an extreme example, it highlights the usefulness of having a spare player to deal with any issues. This leads me to my next point. What does a Freeman do?
What does the Freeman do
As mentioned above, the Freeman problem solves in defence, occupies dangerous areas of space and blocks direct entry into the circle.
Blocking direct entry into the circle:
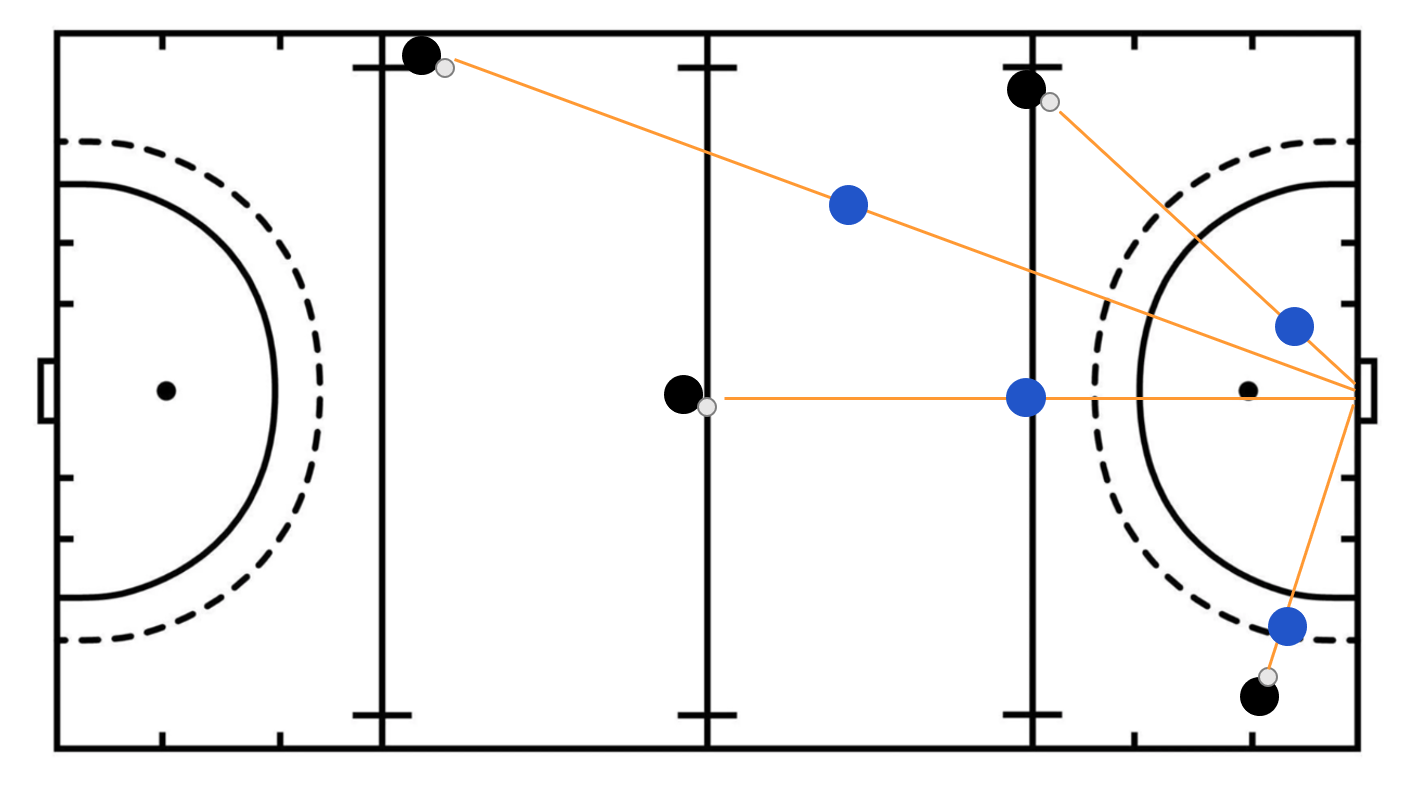
Structurally wise, the Freeman stands on the hotline. If you are unfamiliar with this term, it is the line between the ball and our defensive goal. If the opposition should try to dribble or pass the ball directly towards the goal, the Freeman should be in the way. For further clarity, the image below displays 4 different orange hotlines. Note how in all cases the Freeman is sitting along the imaginary hotline.
General guidelines
Looking at the image you can see in each case that the Freeman (in blue) is sitting at different heights along the hotline. While each scenario may have specific requirements there are a few general guidelines we can apply. Firstly, we want to make a tackle outside the circle. One of the main reasons a team choose to play with a Freeman is to prevent an easy circle entry. Additionally, if the Freeman commits a foul, the result simply slows down the play instead of the opposition gaining a penalty corner. The second guideline is that you want to connect the defence and the offence, not only to limit the opposition's space but to provide an easy option in the event of a turnover. While you aim to stay on the hotline and outside the circle, specific scenarios may require a different position. So, adapt your position to minimise the danger posed by the opposition.
Occupying dangerous areas of space
The Freeman plays an important role in the press before and after it breaks down. Before the press breaks down the Freeman needs to occupy the dangerous areas of space. As mentioned above, this limits the opposition space to outlet and provides an easy passing option when the ball is turned over.
This image shows what a standard back 3 press would look like without Freeman in it
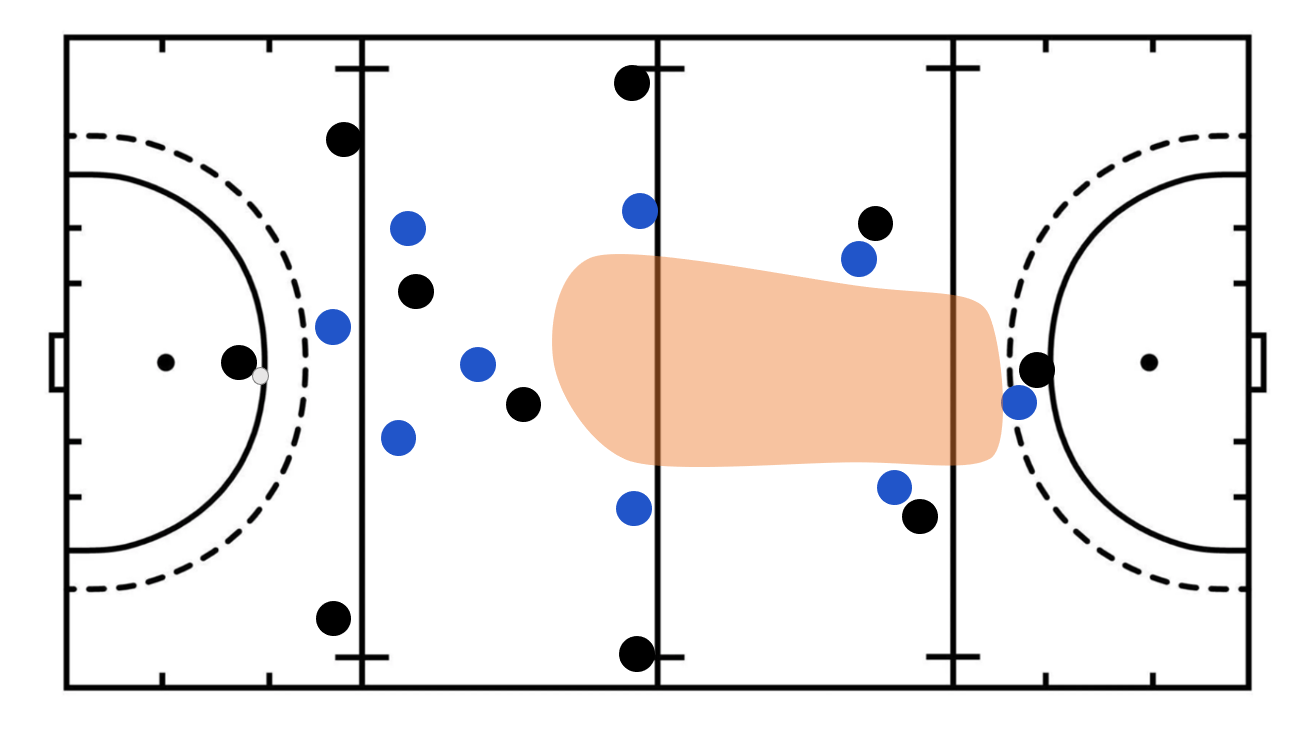
The orange shape indicates the available space for the opposition to work with when we do not have a Freeman. As you can see, it is a large threatening space that could be even larger if the opposition wingers decide to hold wide. The middle of the pitch is a dangerous position as it allows for the opposition to dictate the defence. When they are in the middle they can go left, right or straight. Whereas when they are forced wide left, for example, they can only go right or straight. Thus, you can easily make it difficult for them to do both.
Problem-solving in Defence
Another use of the Freeman is that it allows you to problem solve in defence. If the press is compromised the Freeman can easily fix this through a tackle or even just forcing them wide through their body position.
A good example of this is when a player is eliminated. An elimination in a press can cause a ripple effect or 2v1's up the pitch. The Freeman can help to balance the numbers in 2 ways. Either they can directly go and tackle the free opposition player on the ball or they can release a teammate closer to the ball and pick up their player. For example consider the following scenario: A breakdown in play has led to the image below. As normal, we are the blue team going in the direction of the red arrow. The black team's Left Attacking Midfielder has eliminated our Right Attacking Midfielder and is running down the line. Our defence has scrambled to pick up our men and are left in the following positions:
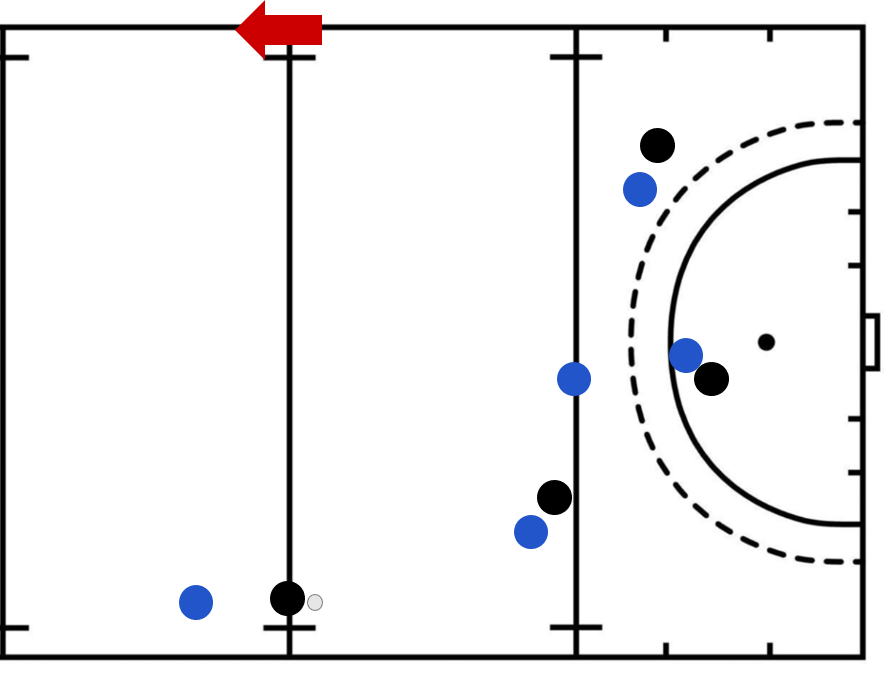
In this scenario, the Left Half is closer to the ball than the Freeman. The Freeman can now release the Left Half to the ball and pick up their player. Now the left half is the "Freeman" and the Freeman is effectively the Left Half. The situation can be dealt with more efficiently and a dangerous attack by the opposition can be forced wide